The intensity integration technique (IIT) is one of the simplest intensity-based image processing techniques used to determine the deformation field of a reflective specimen (1D or 2D) under loaded conditions. It works on the energy conservation principle. The total quantity of light that falls on the specimen, before and after loading it, is assumed to be the same, and hence, the integrated (cumulative) intensity is used as a correlation parameter to find the change in position of any point from one state to the other. Because the cumulative intensity is unidirectional, it is simple to apply IIT on the one-dimensional object. This work aims to apply IIT on the curved strip to find the deformation field of centrally loaded clamped plates along that stripe. The experimental results are compared with the numerical solution. Simulation is done to mimic the behavior of the several types of curved strips (grid pattern) at various positions for different loading conditions based on one-to-one mapping of finite element (FE) models with experimental images.
Various optical measurement techniques and methods have been developed over the last five decades in the field of optical metrology and structural mechanics (De la Torre, Hernández Montes, Flores-Moreno, & Santoyo, 2016). Optical measurement techniques mainly make use of reflected light rays from the specimen to obtain its deformation field applying either interferometric or non-interferometric principles (Kulkarni & Rastogi, 2016). Moiré methods, electronic speckle shearing interferometry and holographic interferometry are techniques which work on interferometric principles. The Moiré shearing interferometers (Subramanian & Subramanian, 1996; Wang & Yim, 1992) use shearing grid procedures for obtaining the curvature and slope contours of the loaded reflective specimens. Electronic speckle shearing interferometry (Aebischer & Waldner, 1997; Groves, James, & Tatam, 2004) records the intensity of fringe patterns obtained because of the interference between the speckle shear waves scattered from the object in the loaded state.
Electronic speckle pattern interferometry (ESPI) (Muravski & Fit’o, 2005; Tendela, Galizzi, Federico, & Kaufmann, 2011) records the intensity images of speckle patterns produced on rough surfaces in load and unloaded state. The fringe pattern is obtained by subtracting the intensity images and applying phase shifting procedure to determine the displacement. Digital image correlation (DIC), a well-known technique, aims to correlate the images of physical speckle patterns generated on the object surface in the loaded and unloaded states (Chu, Ranson, & Sutton, 1985; Hild & Roux, 2006; Schreier, Orteu, & Sutton, 2009). The references listed are representative and not exhaustive. Thus, the literature related to correlation techniques like ESPI and DIC requires two intensity images captured in loaded and unloaded states. The correlation between the images is achieved through numerous phase-shifting techniques in ESPI, and by maximizing the correlation coefficient between the subsets through various scanning procedures in DIC.
The intensity integration technique (IIT) is also an intensity-based image correlation technique based on the energy conservation principle. It has similarities with the other techniques like ESPI and DIC in capturing two digital images in different states of the object but it differs in the experimental set up and correlating algorithms. This technique does not project any speckle pattern on the specimen surfaces (DIC), nor does it use a more complicated experimental setup (ESPI). The experimental setup for IIT has an optical bench where the specular reflecting cantilever specimen is illuminated with a diverging laser beam (Subramanian & Jagannath, 2001). The reflected light from the specimen is made to fall on the screen. The reflected images in two states of the specimen are captured using a CCD camera and used for finding the deformation field. The cumulative sum of image intensities reflected off any specular reflecting specimen across two states (load and unload) is assumed to be same. The difference in the pixel positions where the cumulative sum of reflected intensity arrays is equal in the two states of the specimen gives the shift along the length of the cantilever. This shift in the reference point (pixel location) is used to determine the slope of a tip-loaded cantilever.
The above concept is introduced for two-dimensional surfaces, like plates, for determining the surface topology (Subramanian & Ramana kumar, 2006). In order to obtain the deformation field over the whole domain, it is segregated into several unidirectional strips optically and IIT is applied along these strips. These horizontal strips in the unloaded specimen change their shapes while loading the plate. The change in position of the pixel is clearly visible in the vertical direction and not along the horizontal direction. Since IIT is unidirectional, the shift Δx experienced by the pixels from their original position in the guidelines is determined by using cumulative intensity as the correlation parameter. Thus the slope values at each point in the guideline are obtained with the help of the following equations:
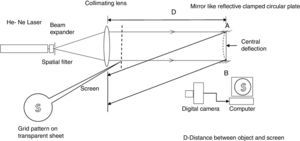
In the above D denotes the distance between the object and screen.
The objective of this study is to apply unidirectional IIT on a curved strip instead of straight line strips as in earlier work (Subramanian & Ramana kumar, 2006) while contouring a centrally-loaded clamped circular plate. The shape of the curved strip is carefully chosen in such a way that it is non-overlapping. The deformation is computed along the curved strip. Many such strips may be used to cover the whole field.
In the present study, firstly, an optical experiment is conducted on a centrally loaded clamped circular plate with the curved strip (S-shaped grid) projected on it. The images with the curved strip in load and unload conditions are captured. IIT is applied along the curved strip to find the deformation field of a centrally loaded clamped plate along its length. The results are compared with the finite element (FE) analysis.
Secondly, a centrally loaded clamped circular plate is modeled and analyzed for known central deflection in ANSYS (Lawrence, 2002). The nodal coordinates and nodal partial slope values are exported to MATLAB to create a mathematical model of it. The mathematical model and the experimental images are mapped and compared one-to-one in a simple manner, taking into account the magnification factor. This is in contrast to more complex procedure where the comparison of FE modeling with experimental data is done by considering the displacement and strain field as images and their decomposition (Lampeas, Pasialis, Lin, & Patterson, 2015). The slope values along the curved strip are extracted, and a simulation is presented to mimic the behavior of the loaded specimen and change in position of the curved strip under different loading condition as well as for different spatial positions within the field.
2Intensity integration technique (IIT) and experimental verification2.1Intensity integration techniqueWhen the specular reflecting specimen is illuminated with a laser, the reflected intensity from it is made to fall on the screen, captured as the image before and after loading. The intensity integration technique, which builds on the principle of energy conservation, considers the total quantity of light reflected off the specimen to be equal in both states. This is applicable for small loading conditions. The cumulative sum of intensities, from the reference point (generally on the edge of the work piece where the slope is zero) on both images, used as correlation parameter, to find the shift Δx or Δy in terms of the change in indices of a point along the intensity array, utilized for determining the slope using Eq. (1) or (2) (Subramanian & Jagannath, 2001).
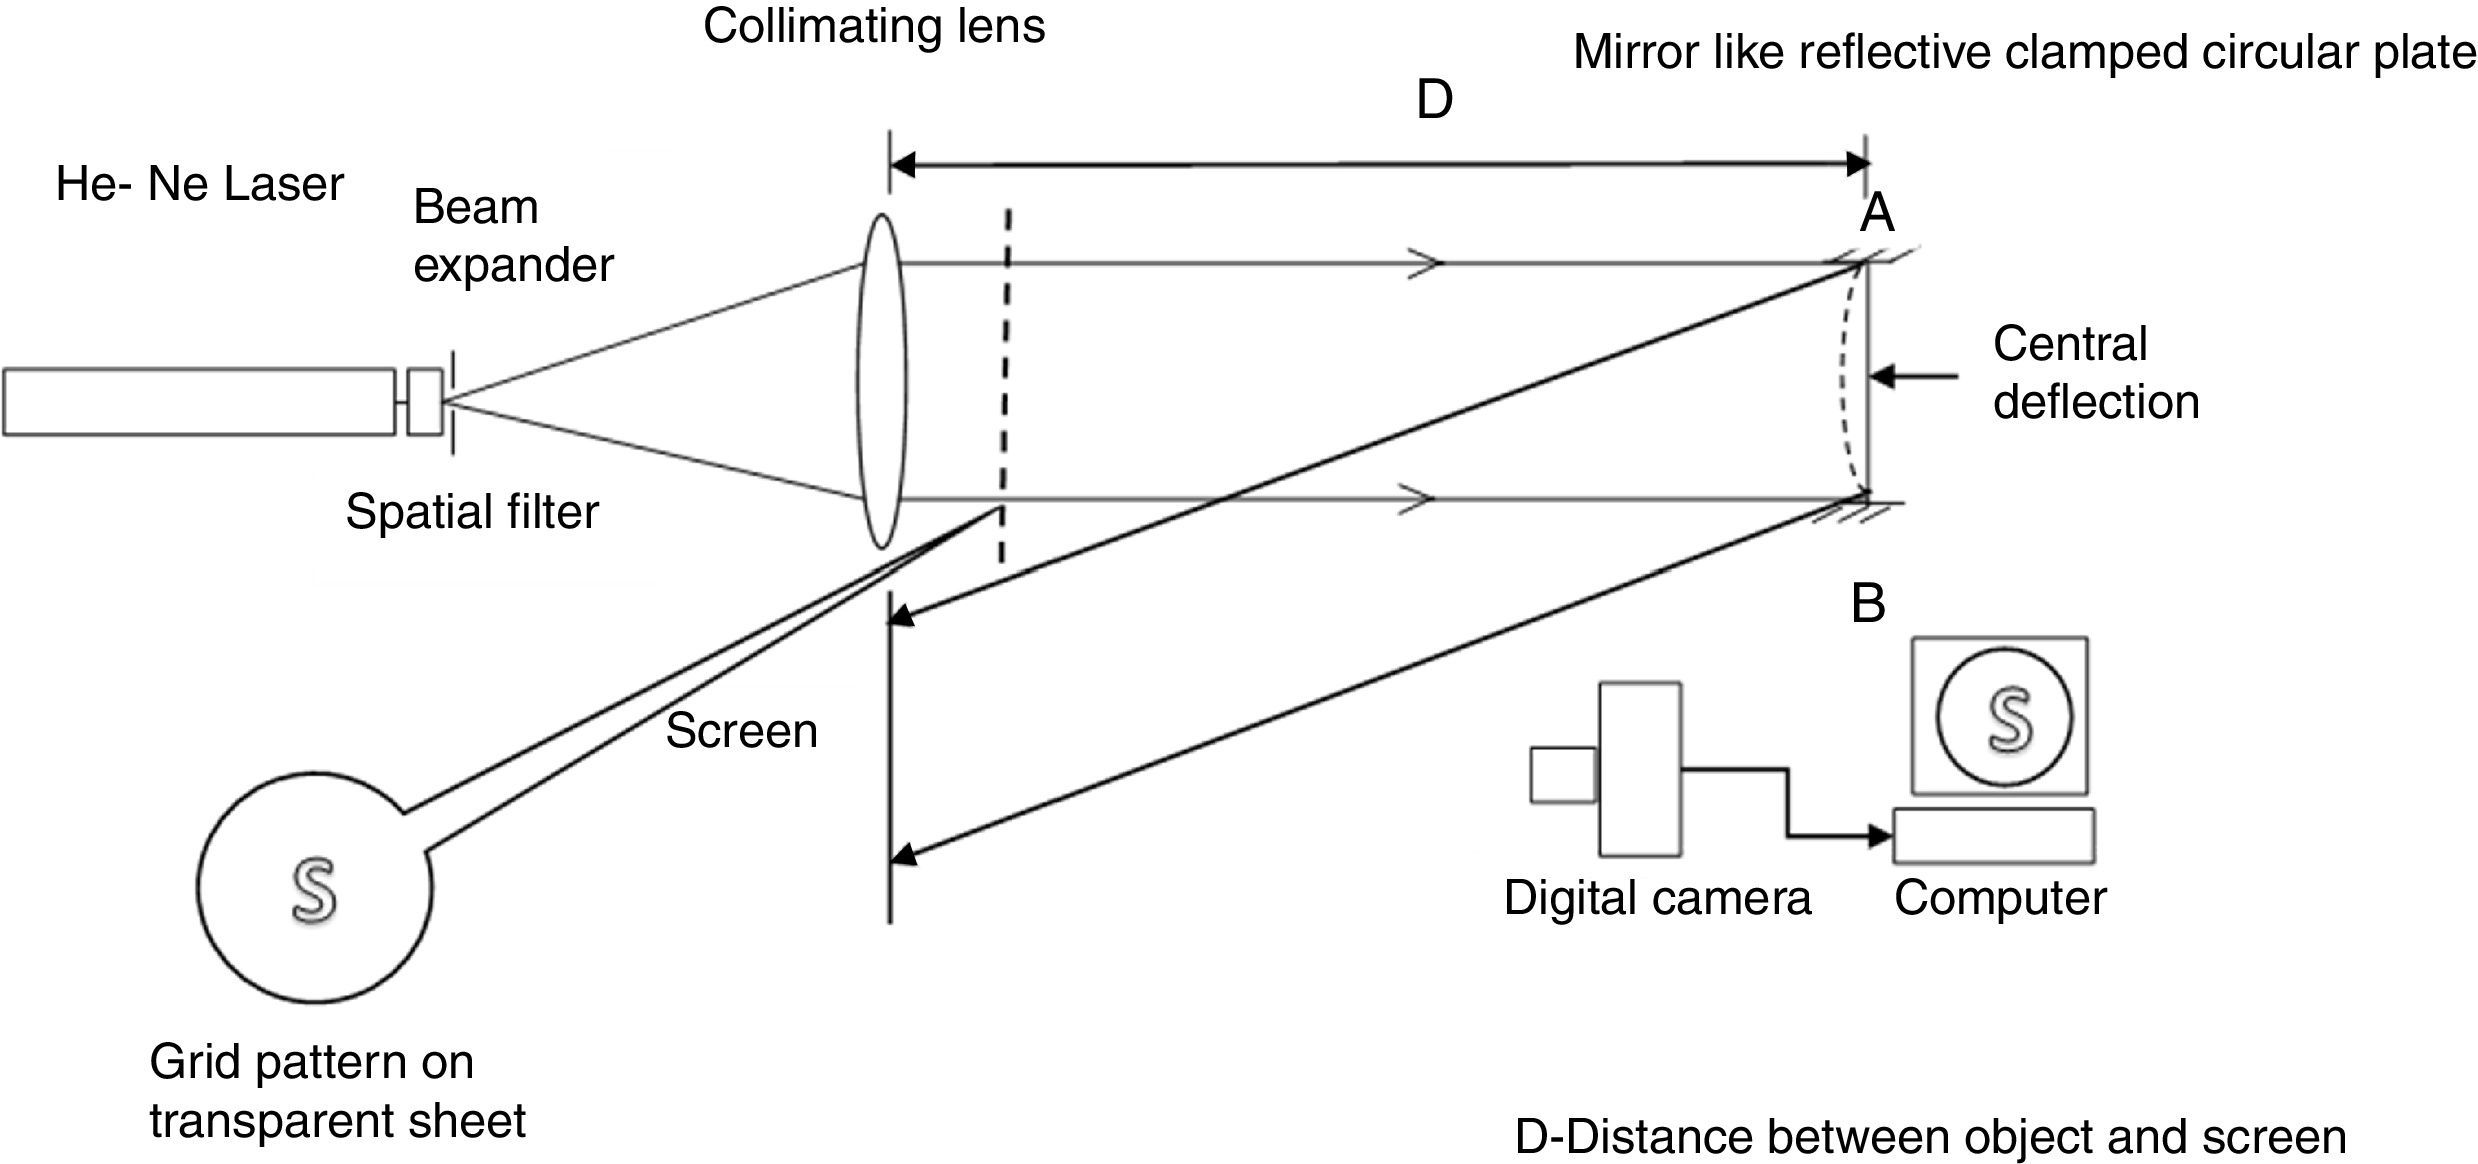
A circular reflecting plate made of Perspex sheet of diameter 40mm is clamped tightly around the edges using a fixture, and a collimated beam of laser light is made to fall on it. The laser and other optical elements along with the specimen are placed on the optical bench for better alignment. The experimental setup is the same as in (Subramanian & Ramana kumar, 2006), except for the shape of the grid. The S-shaped curved strip, printed on a transparent sheet, acts as grid. It allows light through the transparent region in it and thus, a curved strip is projected on the plate by placing the grid on the path of the laser. The screen receiving the reflected light from the specimen is kept by the side of the bench at a distance D from the specimen in a near-normal position. The angle the reflecting light path makes with the illuminating light path is about 7°. Accordingly, the specimen is tilted slightly with respect to the illumination direction. The images, captured using a camera with half an inch CCD sensor from the matte white screen, get digitized and transferred to the computer. The central deflection ‘w’ is given on the plate through the thread mechanism which, in turn, is attached to the dial gauge. Once the experimental setup is aligned properly, the specimen is loaded with a pin for central deflection of 0.07mm. The loaded image is captured first, and the deflection is released to capture the unloaded image.
The experimental setup is shown in Figure 1.
2.2Image processing and IITThe captured images from the experiments in two states are used for further processing to compute the slope and curvature of the centrally loaded clamped plate. The various steps followed to get the slope values from the raw images are listed below.
- Step 1:
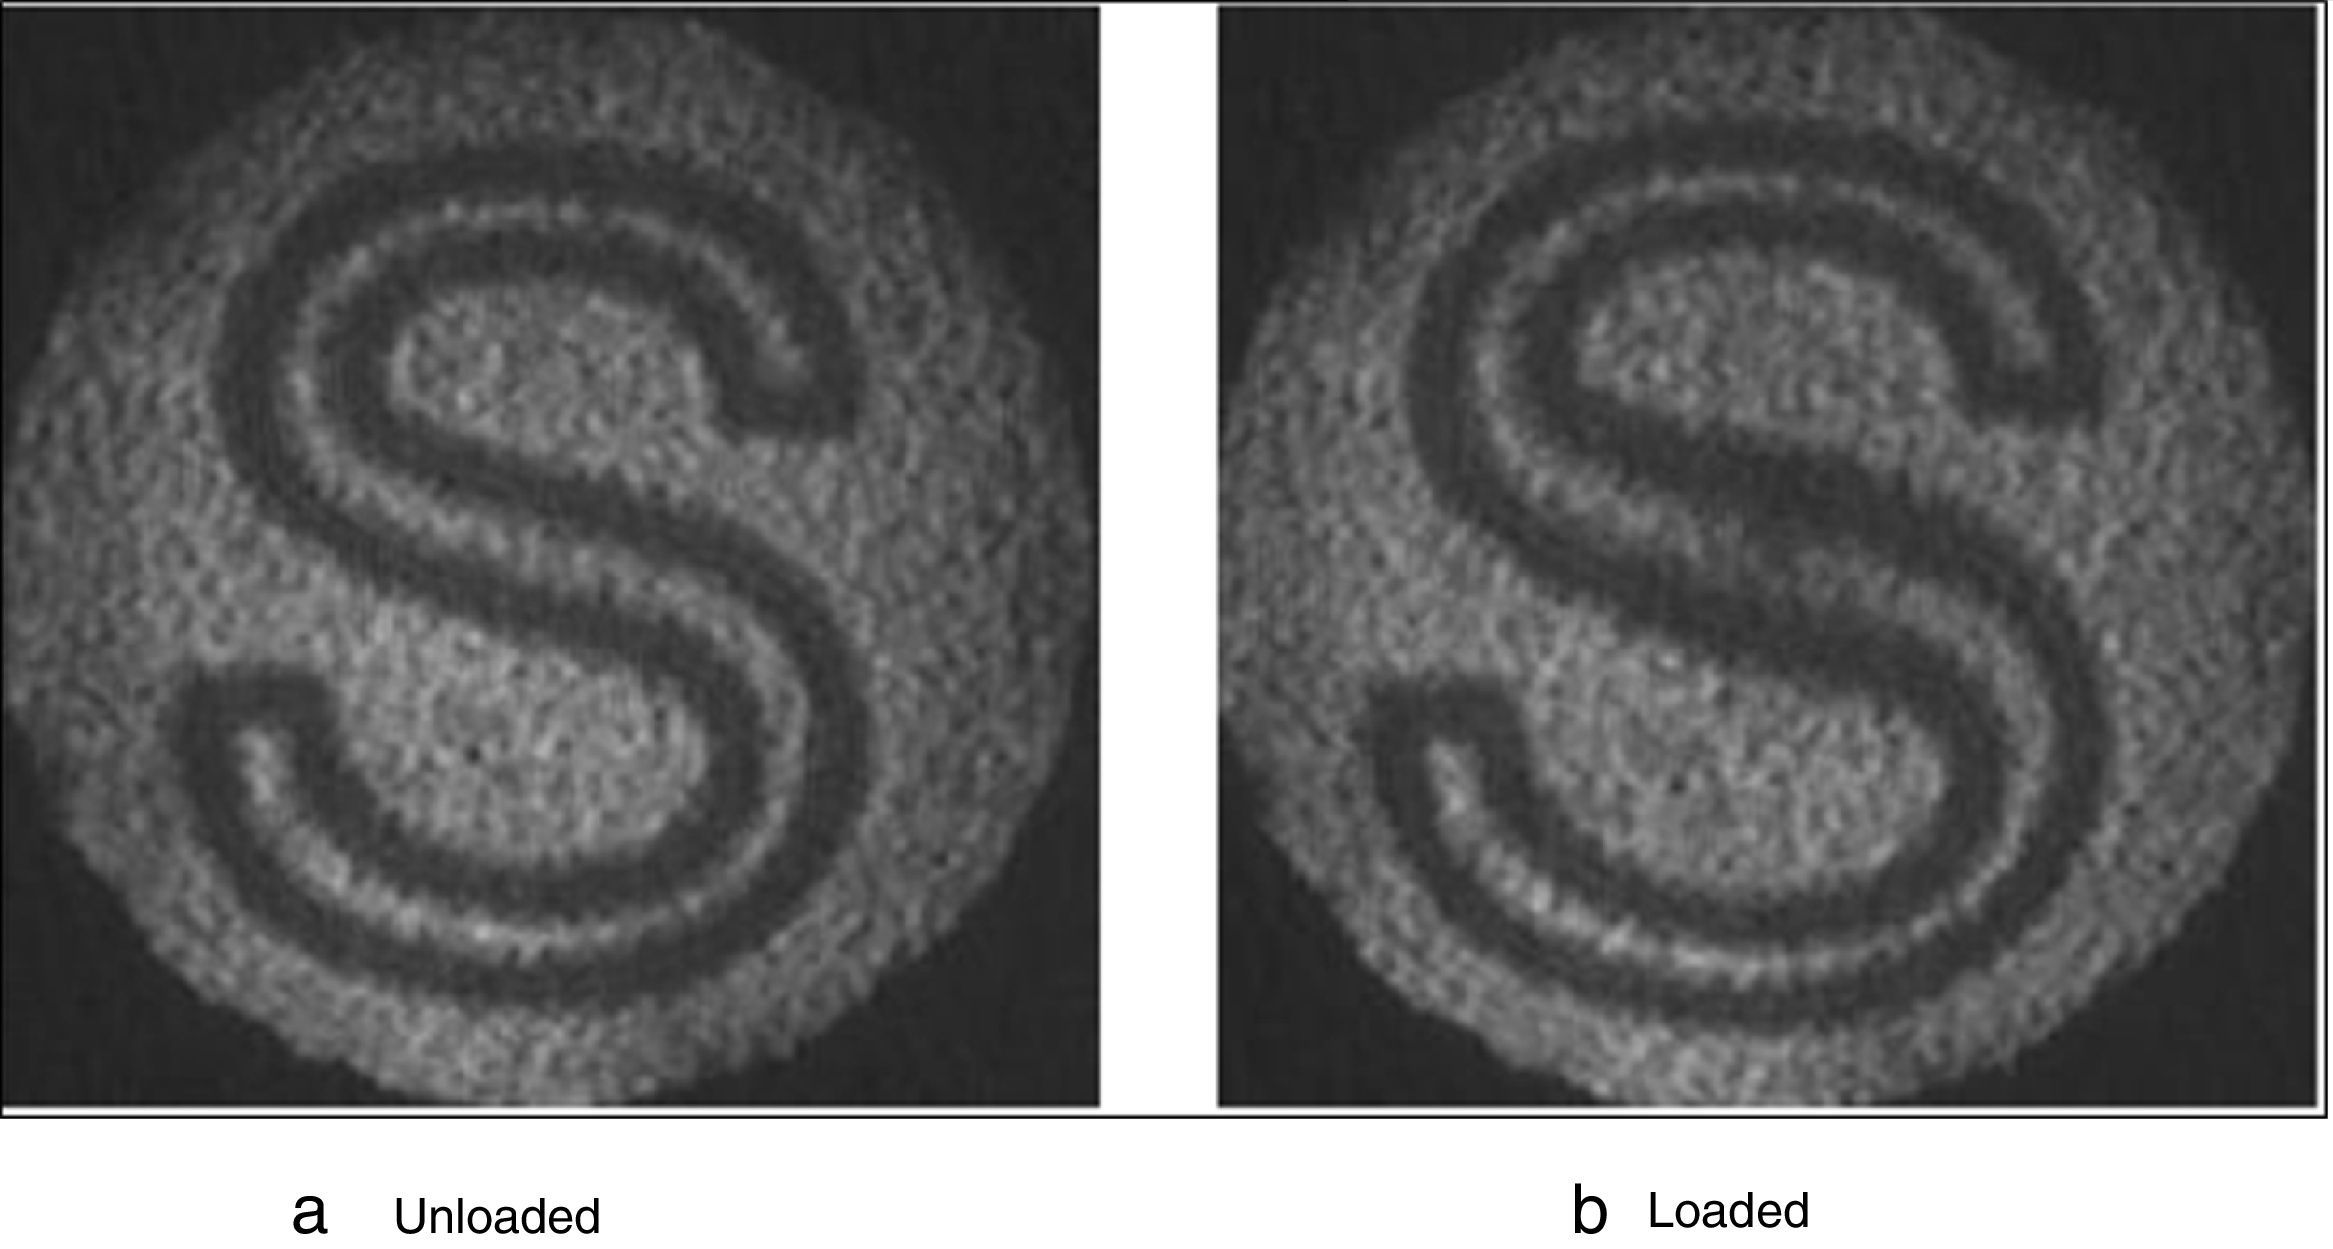
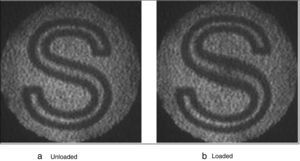
The reflected specimen images on the matte screen are captured using CCD camera before and after the application of load without disturbing the setup. The captured gray scale images under loading and unloading condition are shown in Figure 2.
- Step 2:
The above-captured images are imported to MATLAB and modified into binary images by applying image smoothing, sharpening and thresholding.
- Step 3:
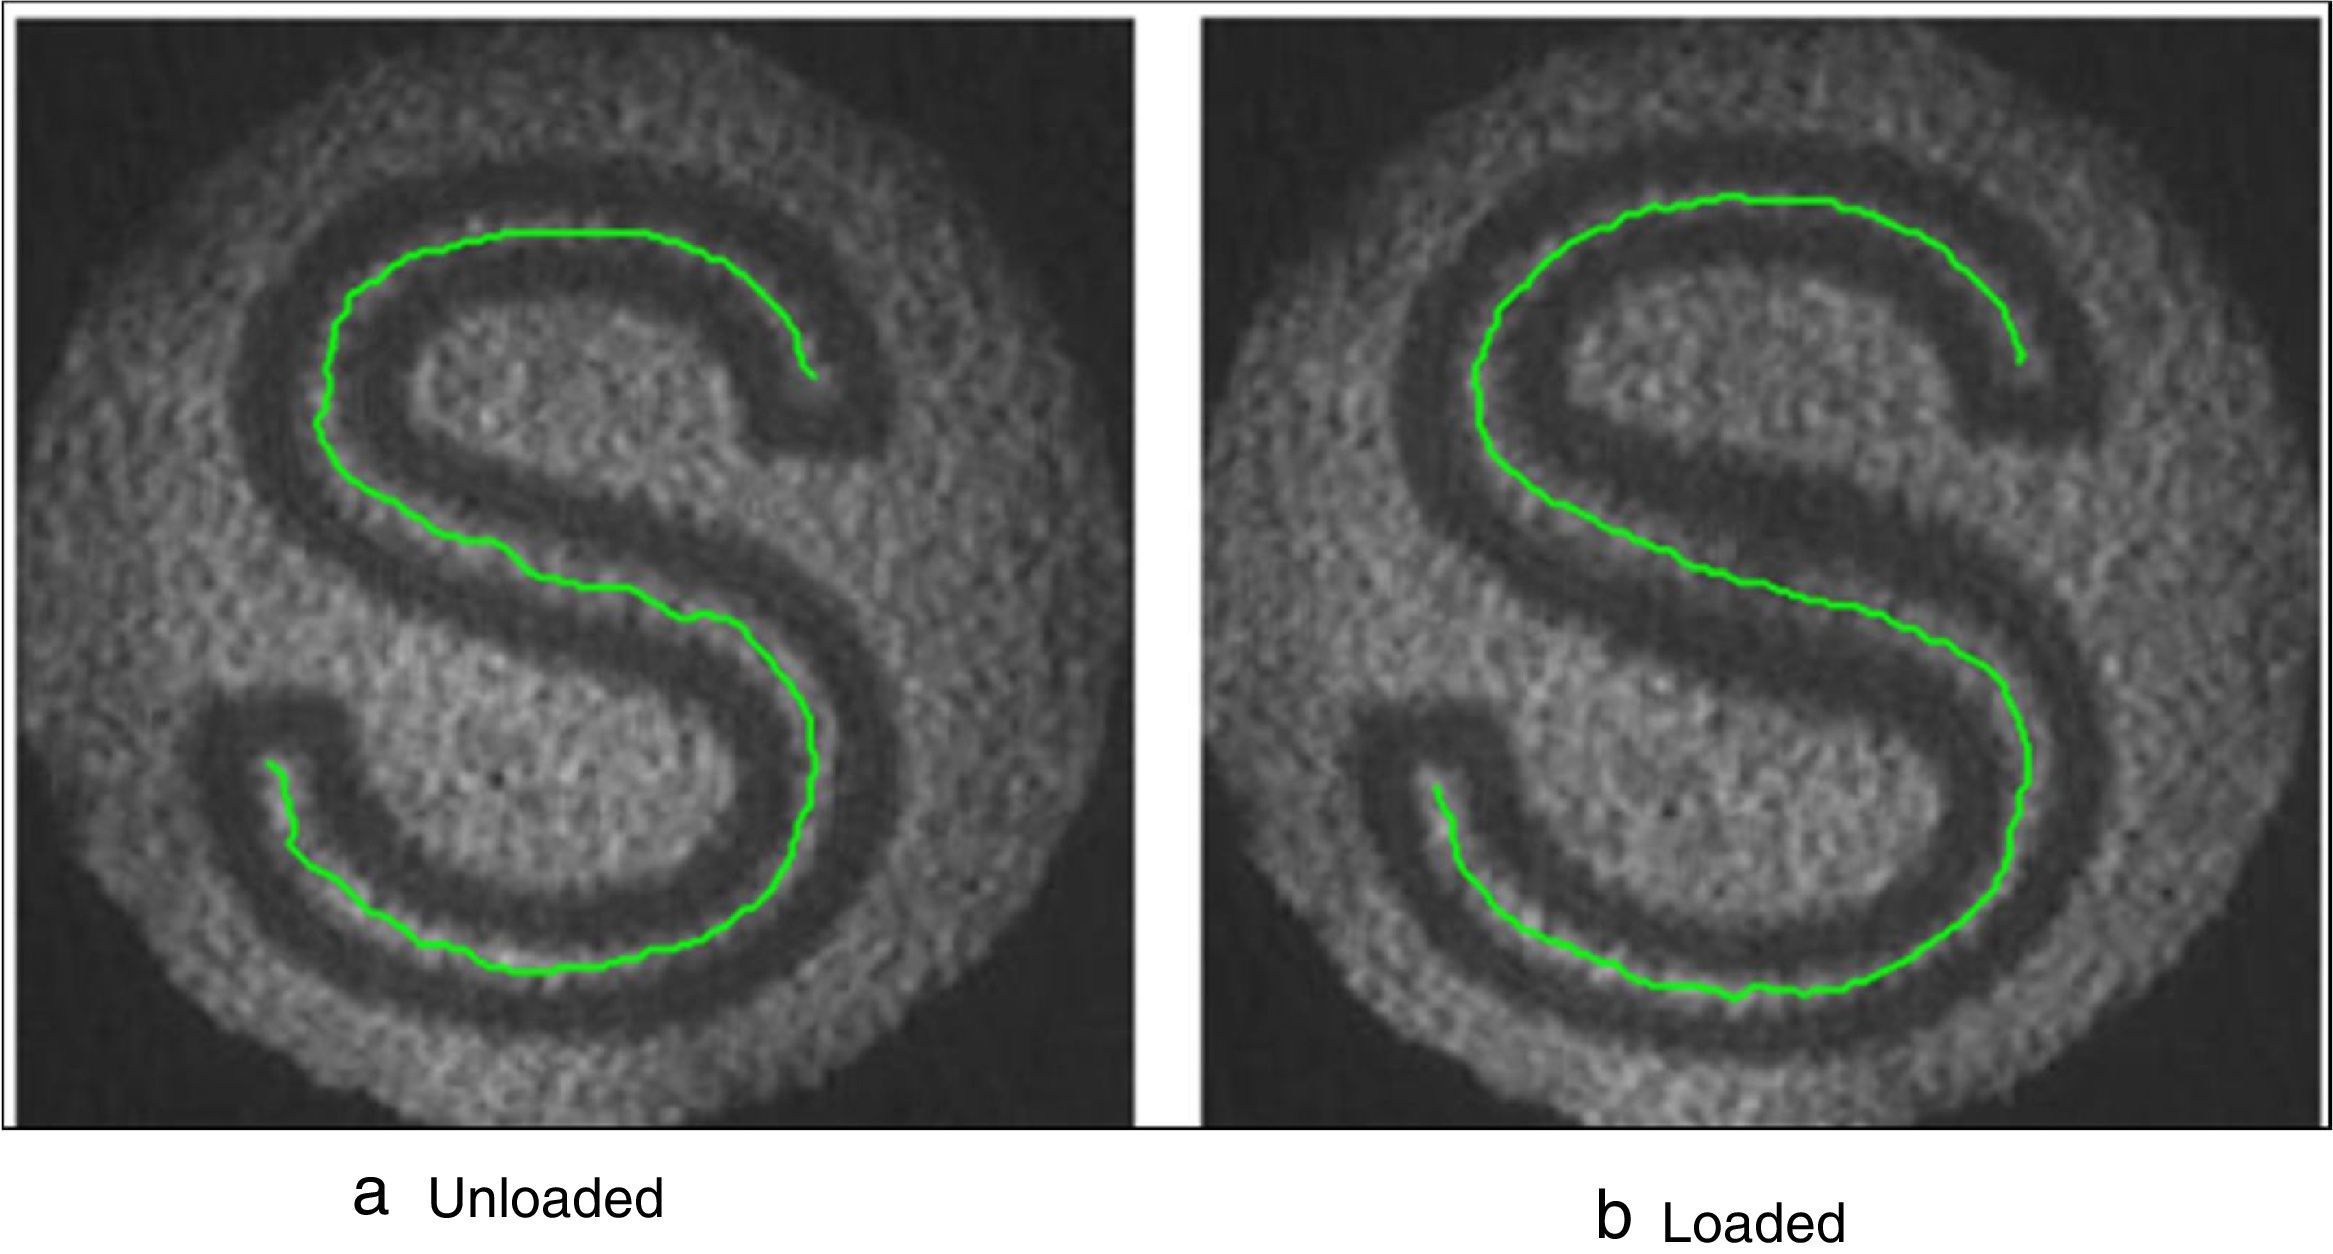
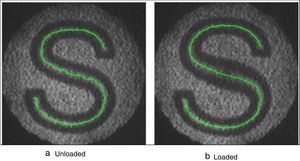
The binary image obtained has an S-shaped curved strip of the thick of the white band. This region is skeletonized further to get a single-pixel width guideline for further analysis. The single-pixel width guidelines for the projected grid pattern are shown in Figure 3.
- Step 4:
These single-pixel width guidelines serve as references to obtain the spatial coordinates of the pixel in both images; however, the actual intensities along the guidelines are obtained from the corresponding pixel position on the experimental raw images.
- Step 5:
The intensity values of loaded and unloaded images are obtained on the spatial coordinates of the guidelines using MATLAB program. Here, the reference point is chosen as the starting point of the S grid in both load and unload images.
- Step 6:
The total quantity of light that falls on the specimen along the grid is assumed to be same, and hence, IIT is applied along the curved strip. The difference in the position of equal cumulative intensity values along the loaded and unloaded images on the guidelines gives the shift in the position of pixel indices along the strip. The computed sub-pixel shift Δs is added to the unloaded guideline's pixel indices. The sub-pixel shift Δs along the guideline at every pixel indices is represented as the vector sum of partial shift Δx, Δy along x and y directions as shown in Eq. (3):
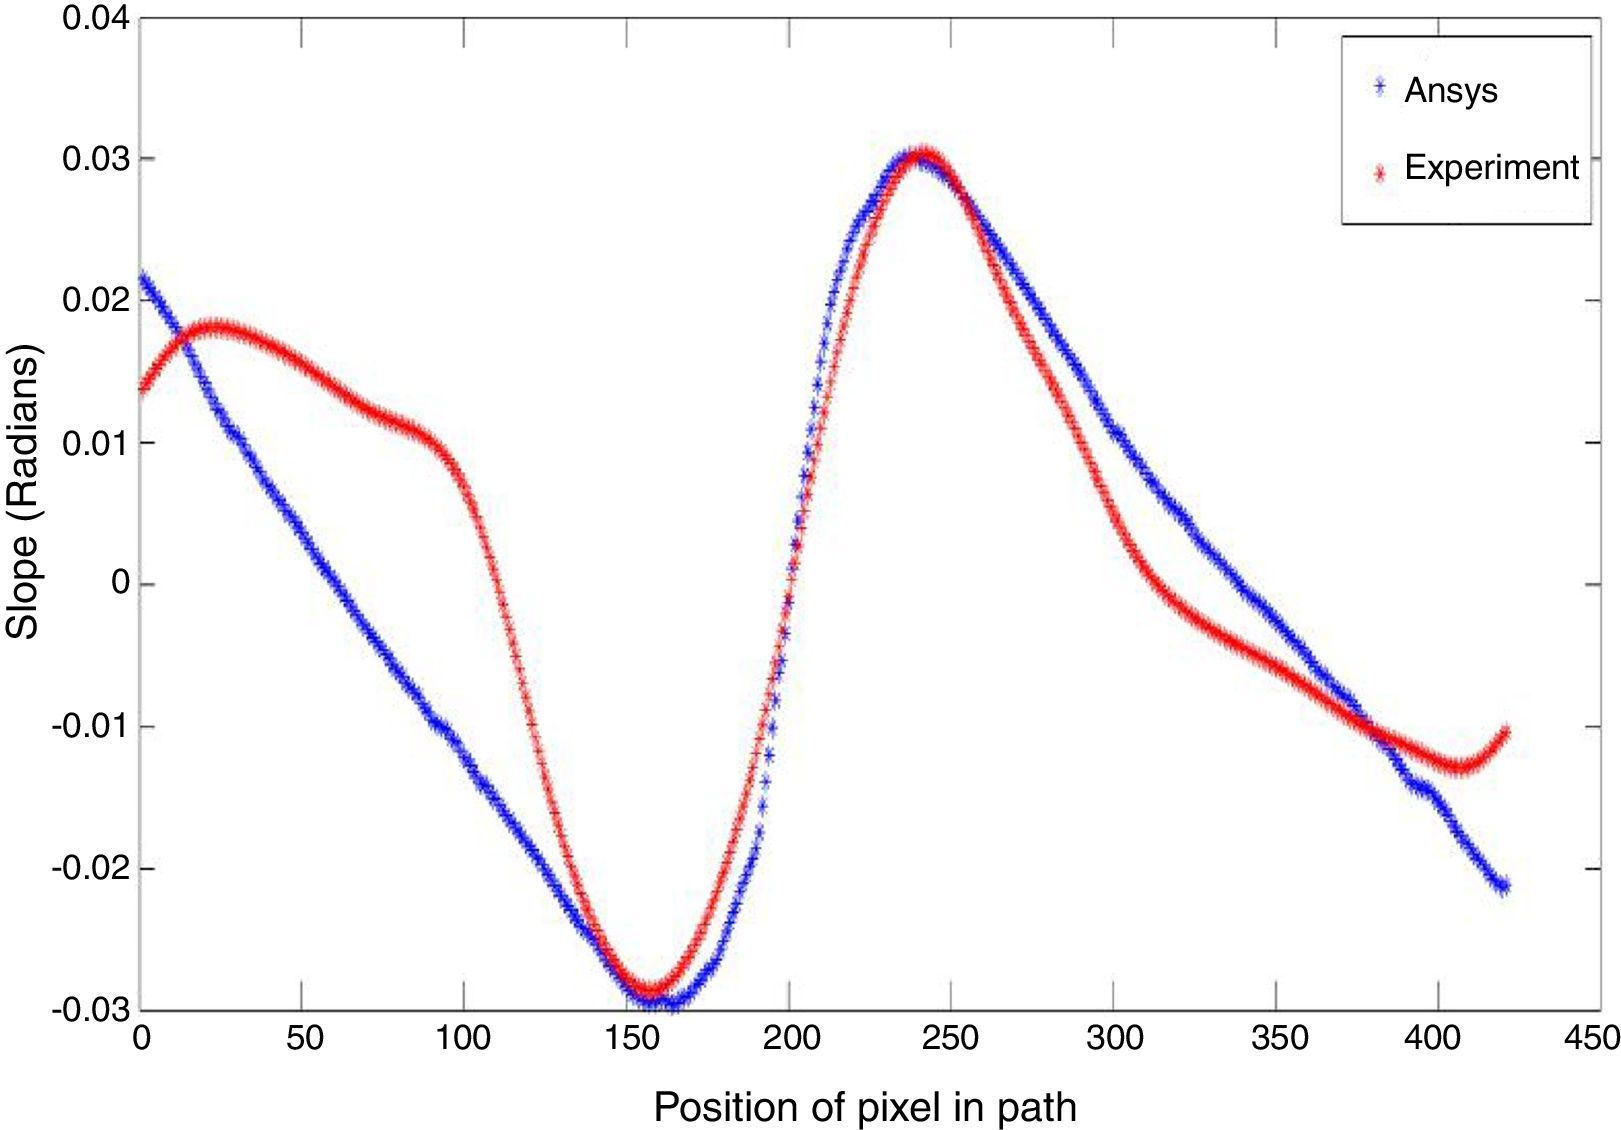
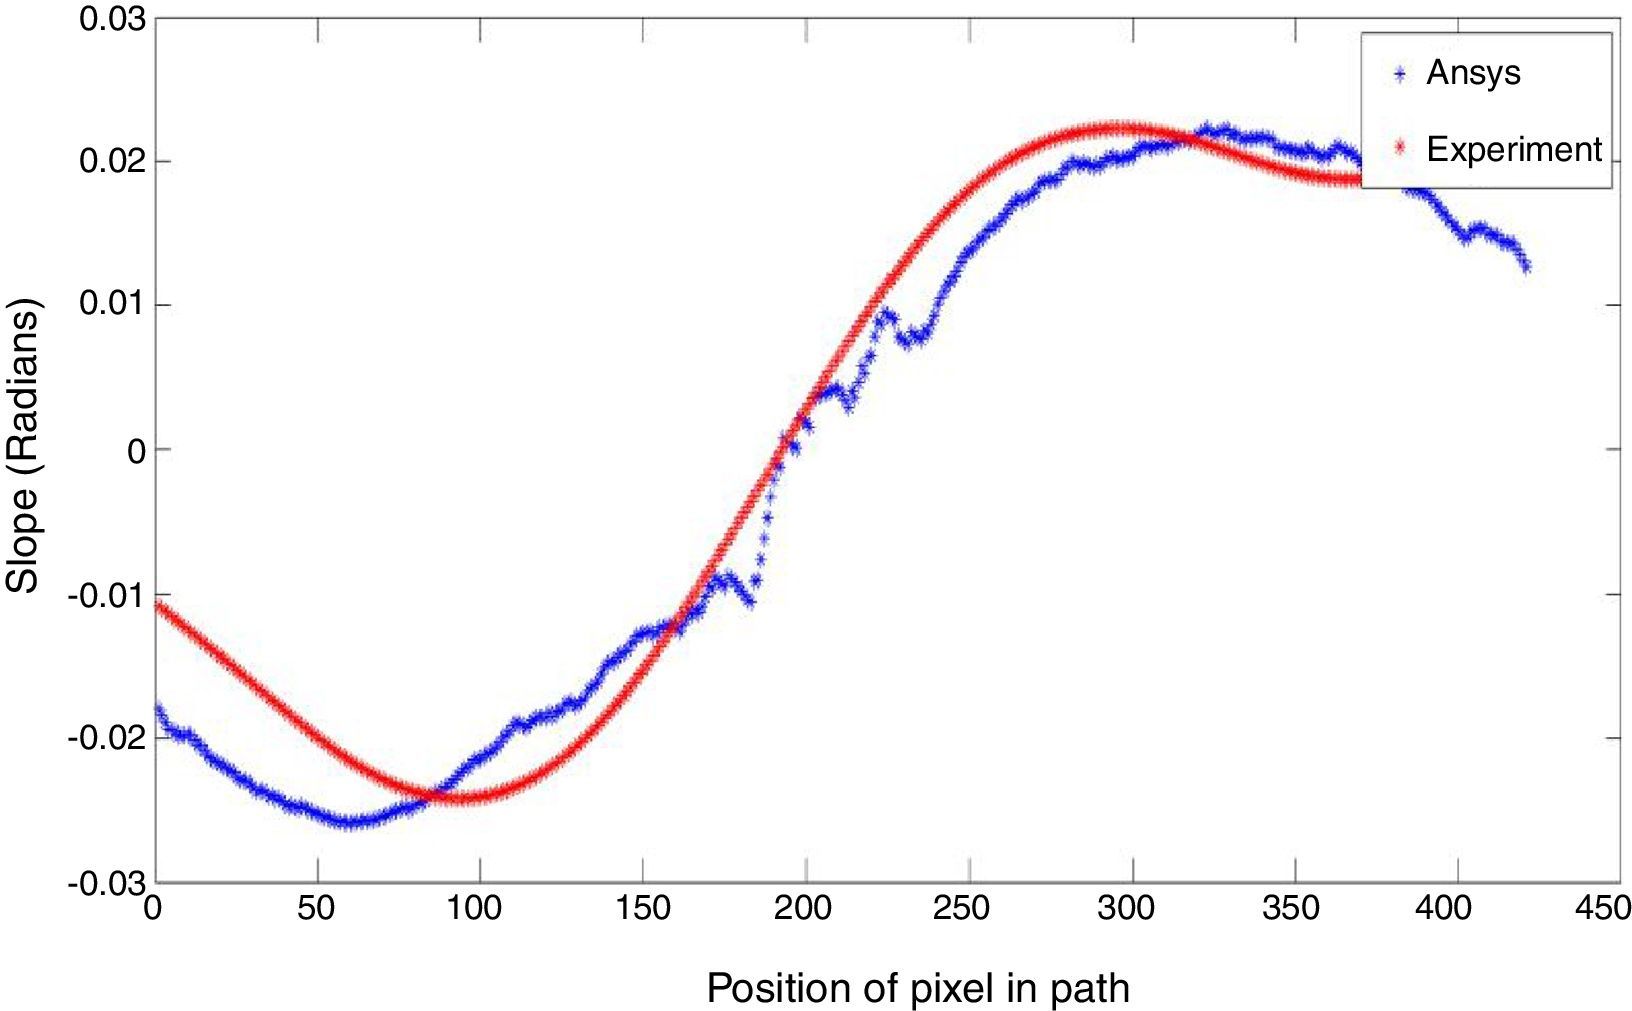
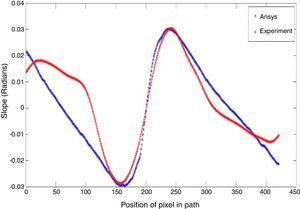
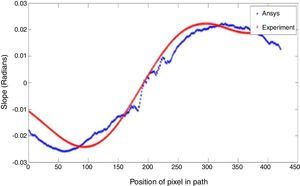
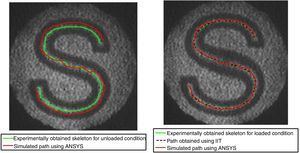
The partial slope values along x, and y directions are determined by using Eqs. (1) and (2) and plotted in Figures 4 and 5. The partial slope values along the guideline are chosen from FE modeling, and the error percentage is around 7% compared with the slope values obtained from ANSYS, as shown in Figures 6 and 7. The numerical solution obtained in ANSYS is validated with the theoretical solution for centrally loaded clamped circular plates for the given loading condition. The numerical solution for the whole field is mapped with the image size and the partial slope values are picked up along the guidelines of the grid pattern.
The experimental slope along x and y axis has noticeable deviations from the numerical solution because of the change in direction of the curved strip. The intensity integration techniques assume that the total quantity of light remains constant before and after loading the specimen; Nevertheless, the error may be due to applying IIT only along the skeleton of the grid and image digitization is not done along the curved strip direction.
3Finite element analysis and simulation of the curved stripThe finite element method becomes a powerful tool for the numerical solution of a wide range of engineering problems. To simulate and compare the results of the optical experiment, the circular plate is modeled in ANSYS and the proper loading condition is applied and solved. The partial slope values for the entire plate are imported to MATLAB for simulation.
3.1Modeling and exporting slope values in ANSYSThe circular plate is modeled in ANSYS (Lawrence, 2002) and discretized into finite elements (4 node 181-Shell). The elastic modulus and the poison ratio of the material are 2e5 and 0.3, respectively. For the application of displacement at the center a hard point is created. While modeling a clamped circular plate, the displacement and rotation at all the exterior nodes are constrained. A deflection of 0.07 is given at the center, and the model is solved to obtain the partial slope values along x and y direction (denoted by ROT-X, ROT-Y in ANSYS).
The slope values for the entire plate are listed according to the node number and corresponding coordinates by using the sort listing option in the general postprocessor and saved for exporting.
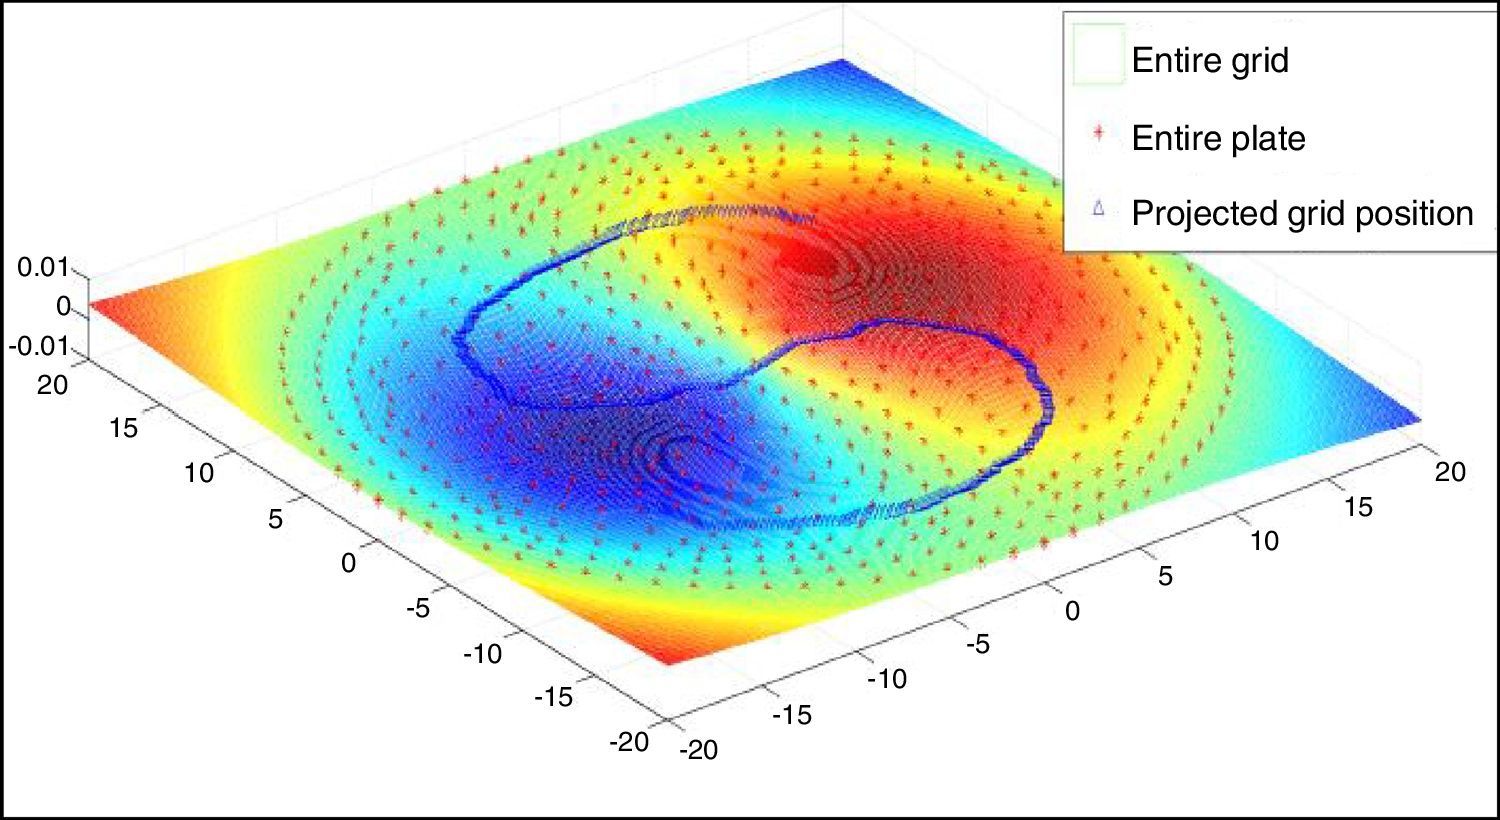
3.2Simulating and verifying the movement of the curved line using ANSYS valuesThe slopes values are listed from ANSYS for the entire plate according to the node number and the corresponding nodal coordinates are imported to MATLAB. These values are sorted based on node number with respective to the x and y coordinates. The grid is formed using the mesh grid command (MathWorks, 2014a) whose length is equal to the diameter of the circular plate and it is divided according to the size of the experimentally captured image. By using scattered interpolant (MathWorks, 2014b), The partial slope values can be determined for the entire grid from the slope values exported from ANSYS. The slope values along x, and y directions for the corresponding guidelines are plotted and shown in Figures 6 and 7.
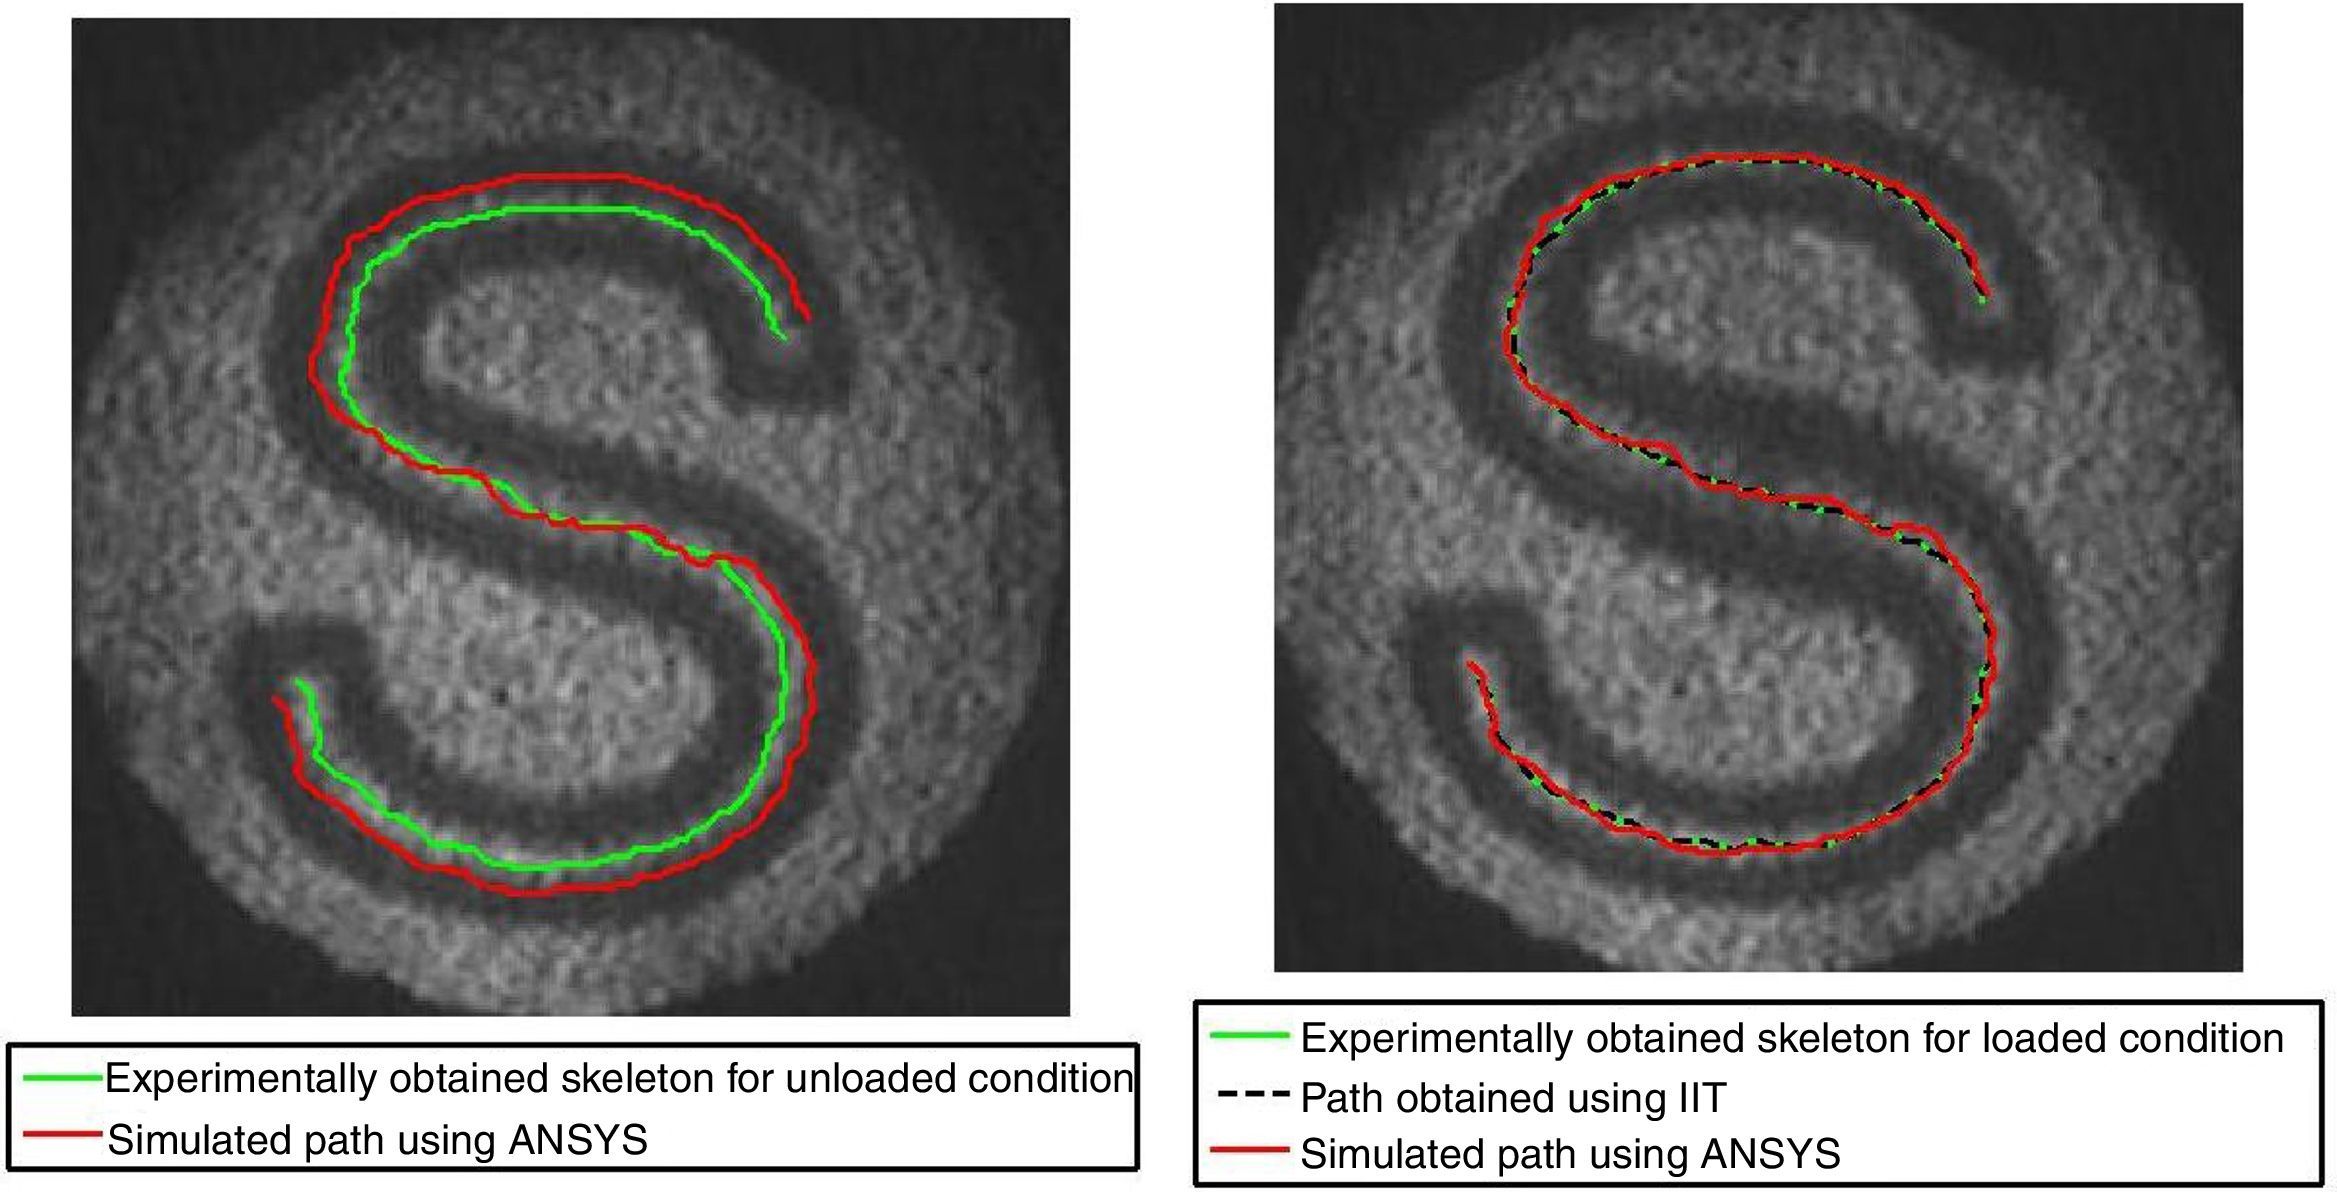
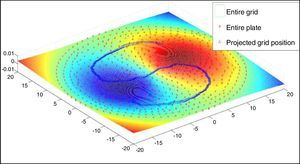
As the slope values for the entire grid are known, the slope values can be extracted from the row and column position of the projected grid pattern. These partial slope values when multiplied with the magnification factor, the ratio of image size with respect to object size, give the values in the pixel coordinate, which is used to simulate the movement of the curved strip under loaded condition. The simulated path results are shown in Figure 8 which clearly indicates the change in the projected curved line.
The change in the projected curved lines for loading condition 0.07mm is predicted using ANSYS slope values. The predicted values are almost close to the experimental result, and it is shown in Figure 8b. The error obtained is around 5% compared with the experimental results.
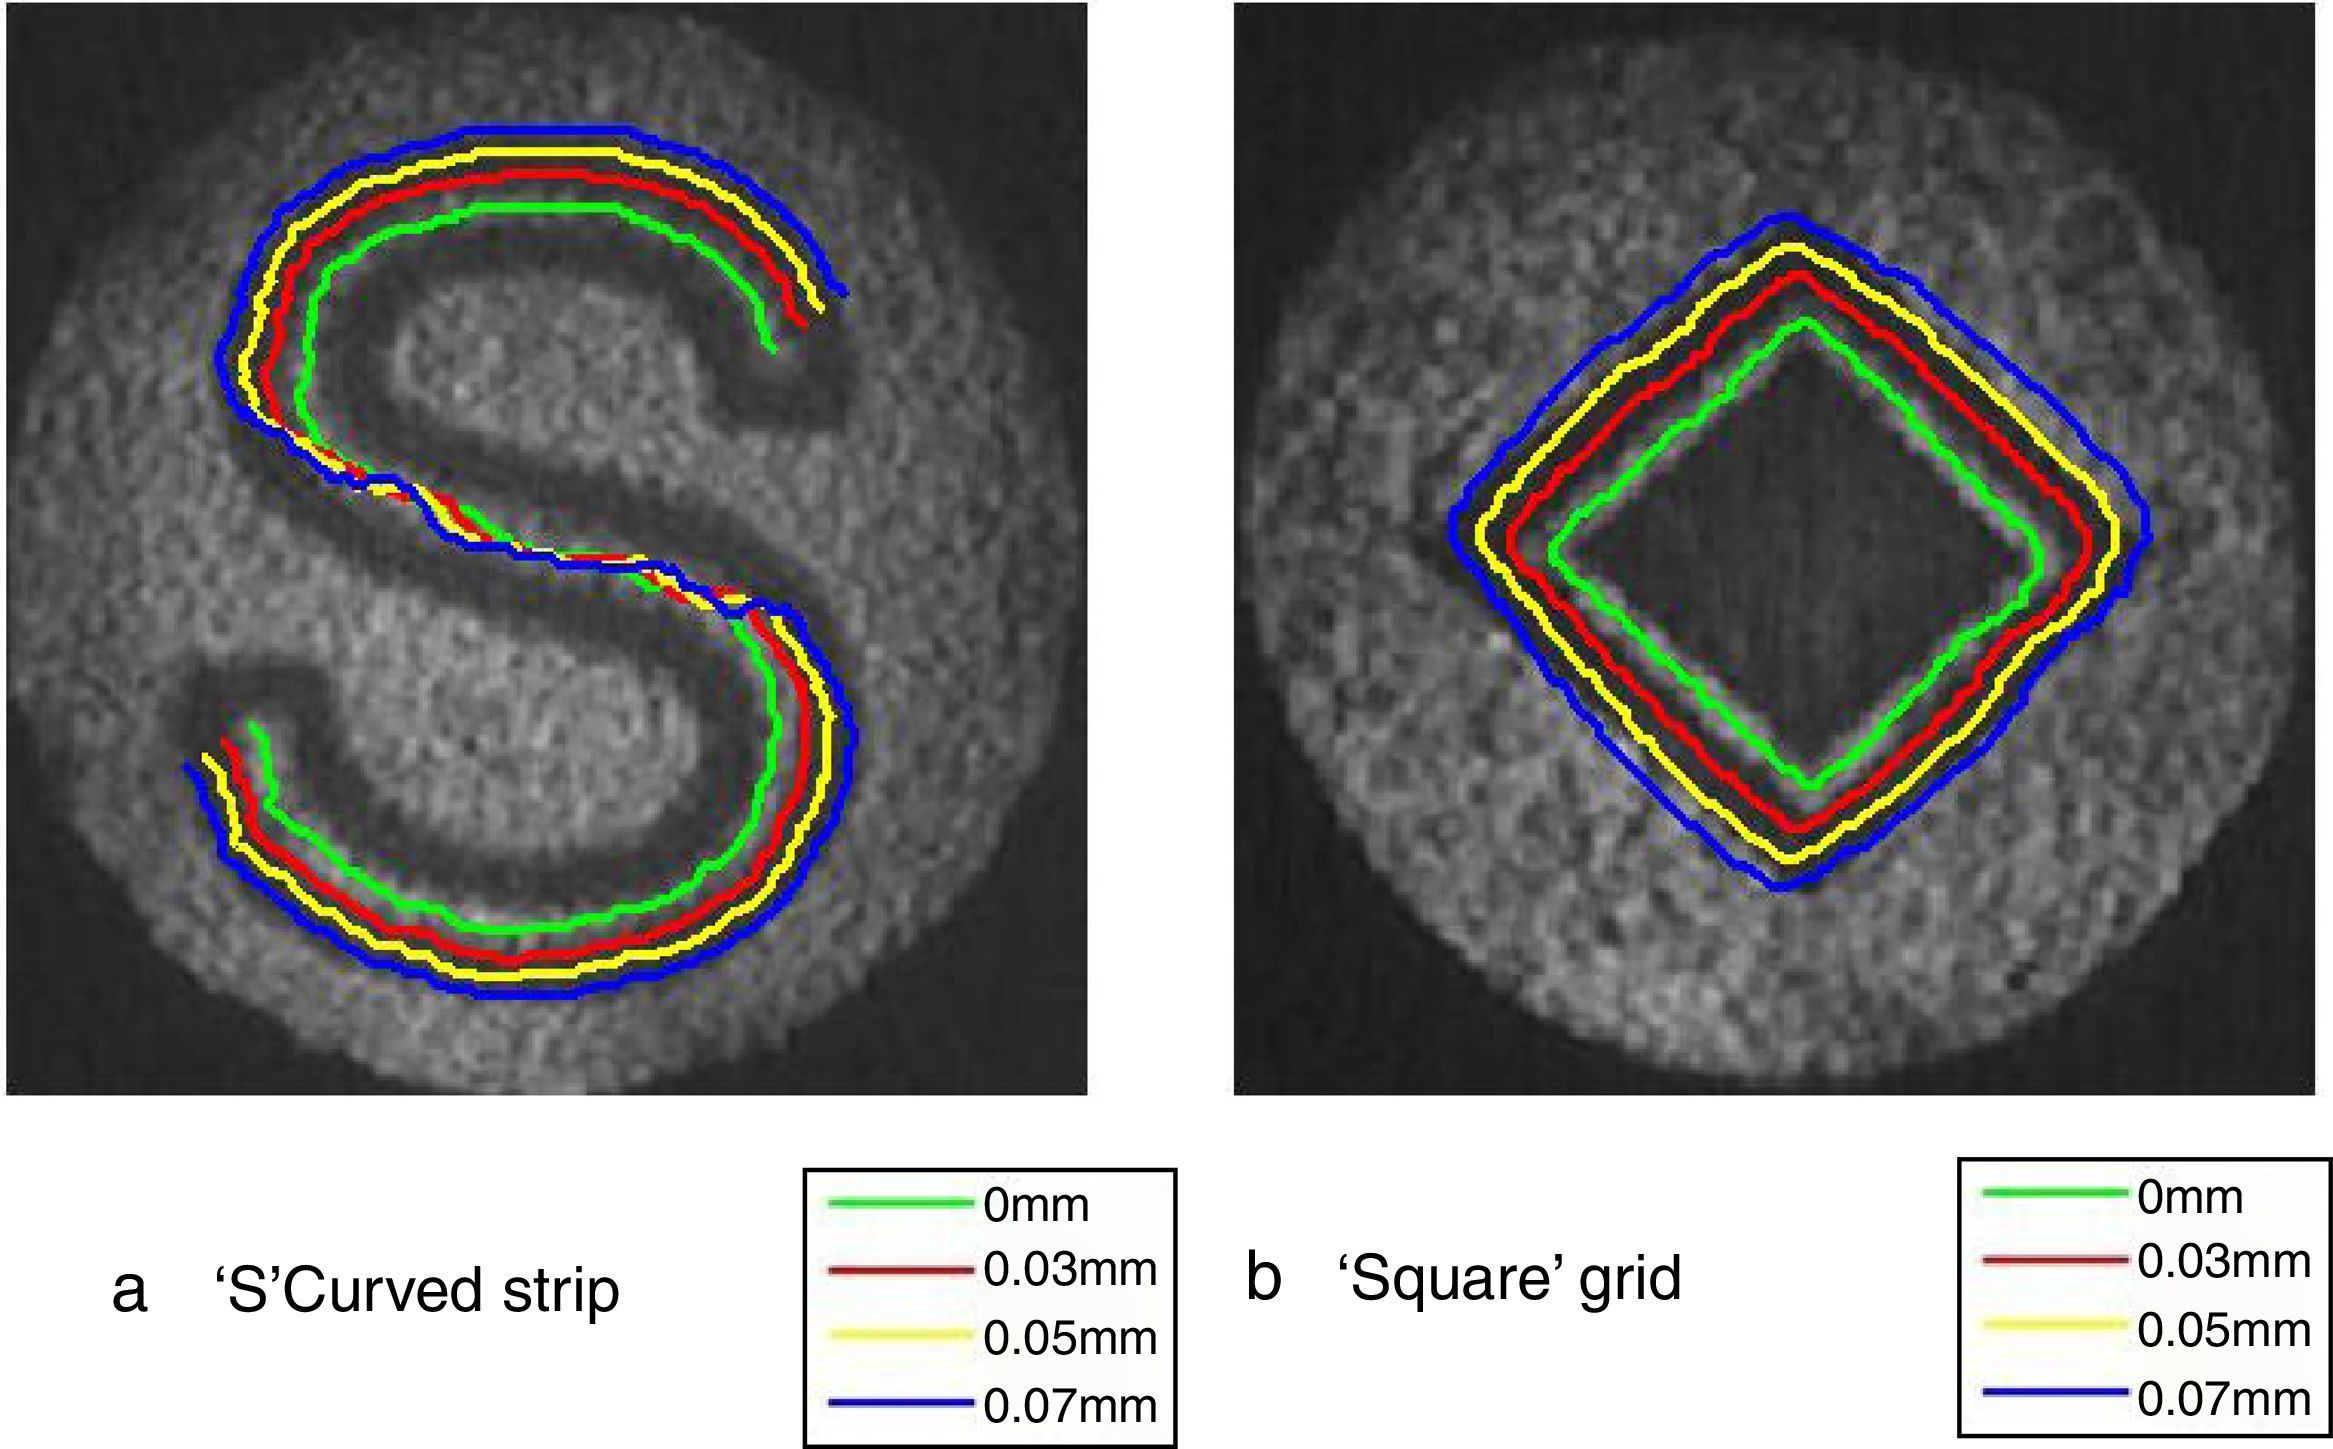
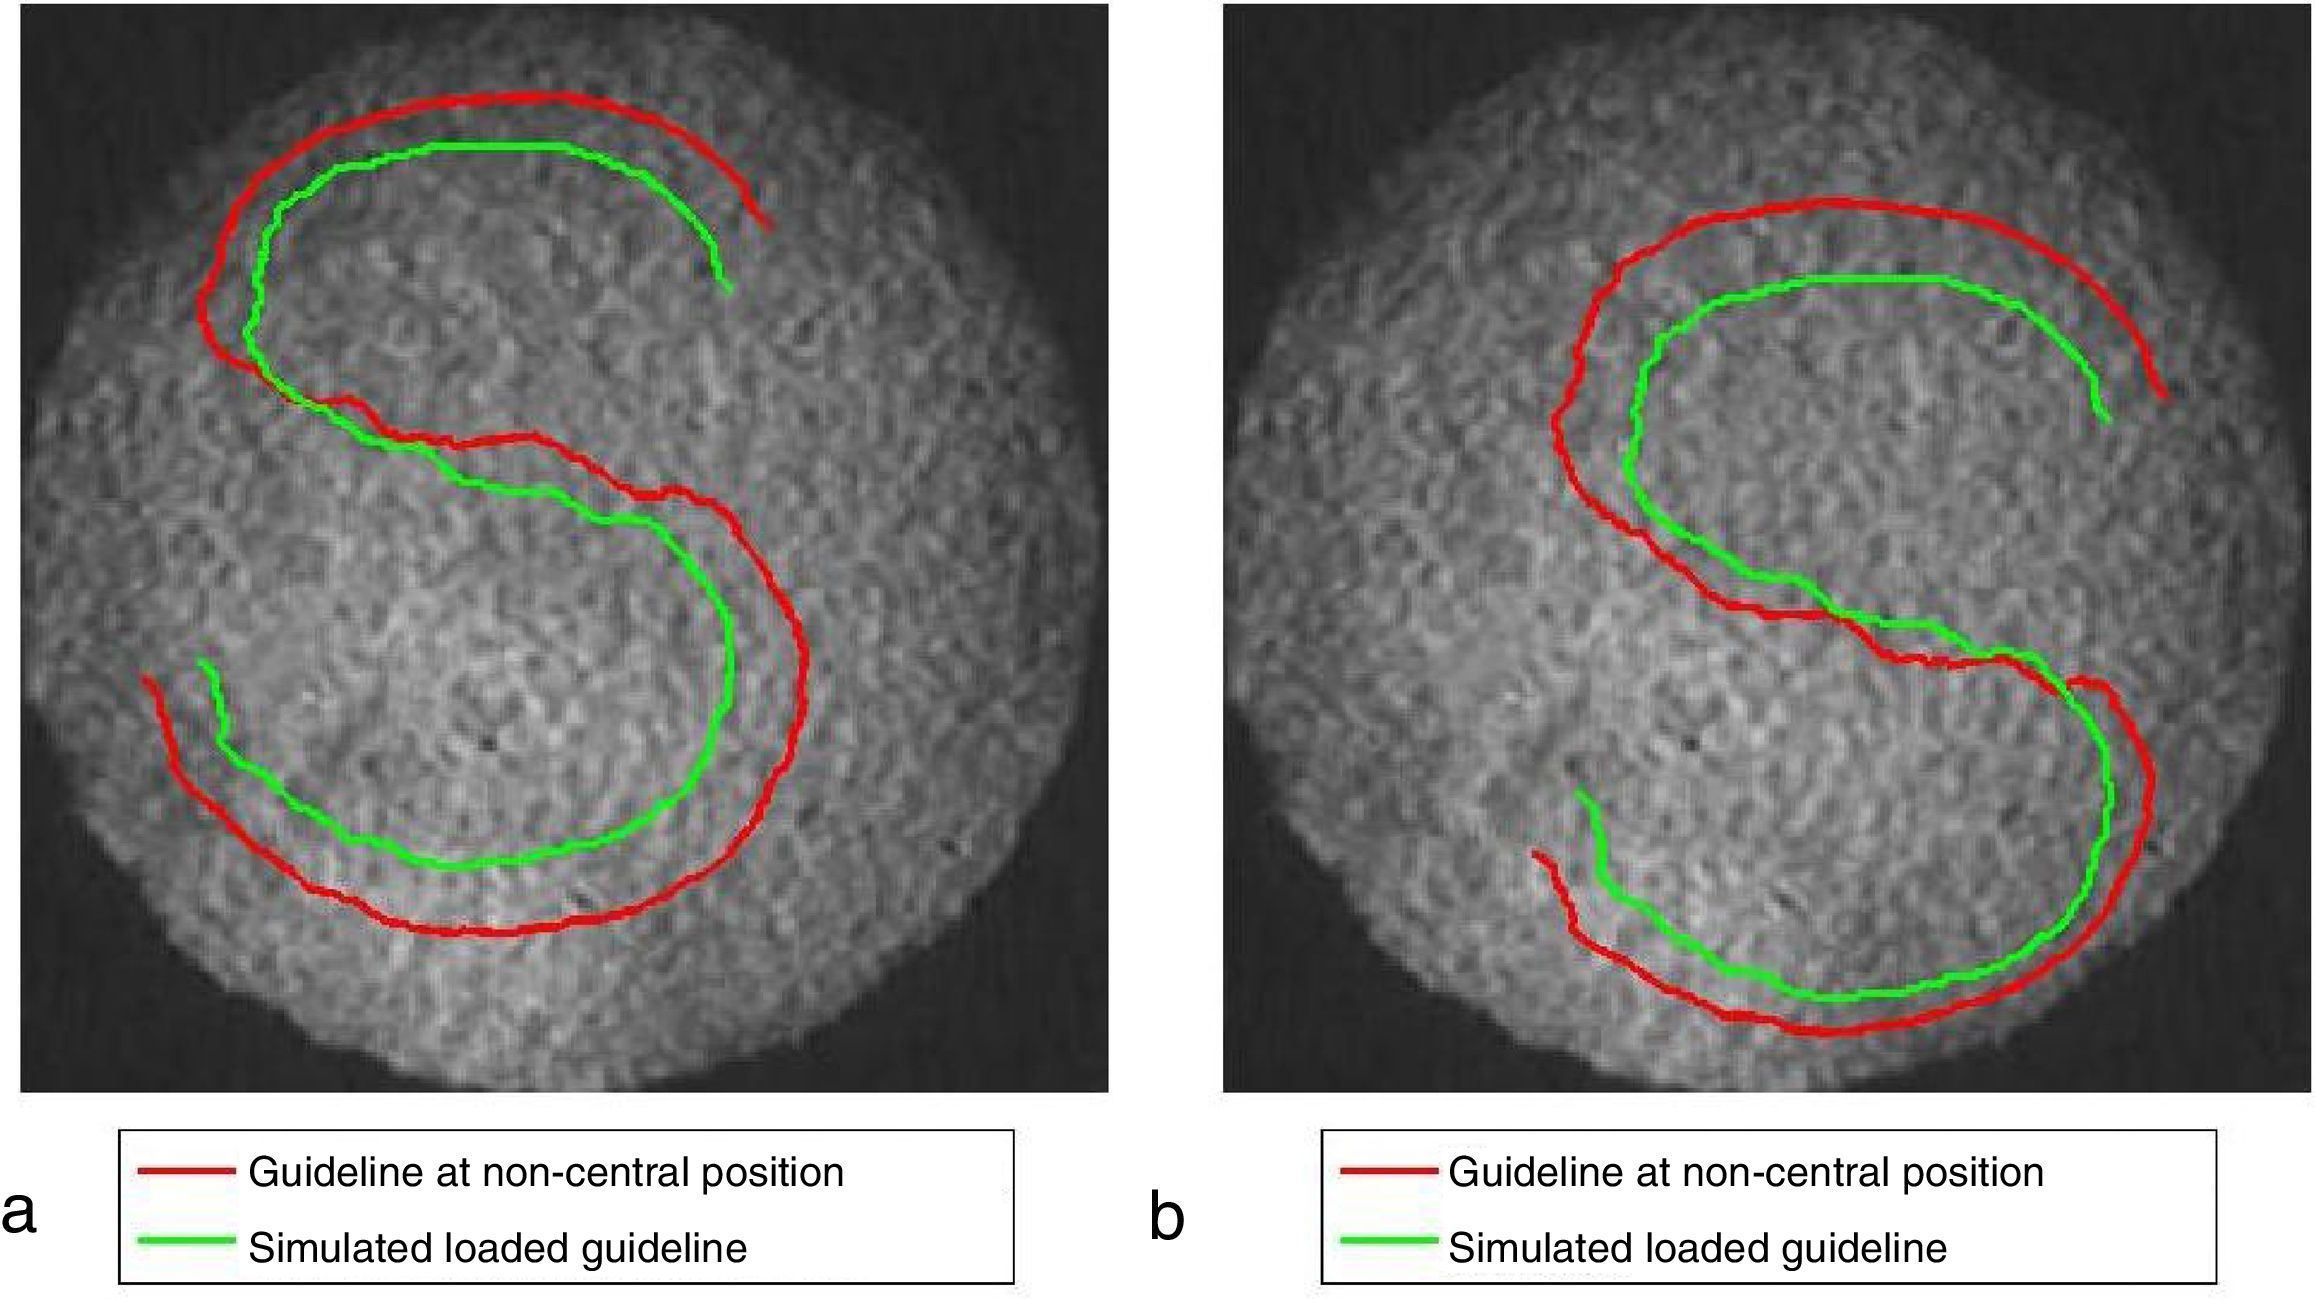
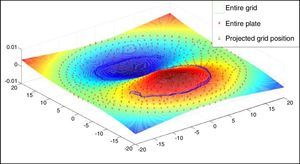
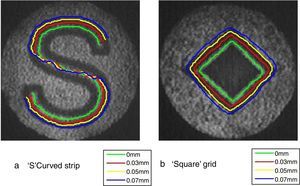
3.3Simulation of path for different loading conditions and pattern positioningThe path can be simulated for various central deflections of 0.03 and 0.05mm applied to the clamped circular plate, it is plotted in the experimentally captured image in the unloaded condition and it is shown in Figure 9a. The experiments repeated with the square shaped grid and simulated path for different loading condition are shown in Figure 9b.
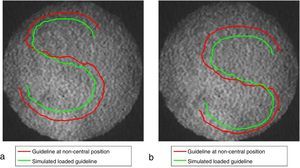
Thus, from Figure 9, the prediction of the position of the different grid pattern can be ensured with different loading condition. It is possible for anyone to simulate the path of the curved guideline if its spatial coordinates and the slope values from ANSYS are known. The simulated path for various positions, by choosing the center of the grid pattern on the upper left and lower right within the clamped circular plate, is shown in Figure 10. It can be clearly observed that the simulated path is asymmetric if a symmetric S-shaped grid pattern is placed in a non-central location within the clamped circular plate as the partial slope values along x, and y are not symmetric with respect to the axis, as shown in Figure 9a.
4ConclusionThis work proves that IIT can be applied along any curved line to find the slope and curvature of loaded clamped circular plates along that. The error in the slope values may be reduced by having the grid pattern along the x and y direction (row and columns of the image), i.e., the S-grid in a digitized manner or digitizing the image along the grid direction. This work agrees with the concept of the reflecting grid method, wherein a change in the position of grid lines directly relates to the slope and Eulerian strain related to the curvature (Subramanian & Arunagiri, 1981) and differs in the experimental setup. The intensity along the skeleton of the curved strips in the two states is used to find the absolute partial slopes of the loaded plate along it and these slopes are used to verify the position of the curved strip on the experimental images obtained in loaded conditions. The length of the curved strip is increased when it is loaded and it makes it too difficult to compute directly the slope by subtracting the spatial coordinates of both grids. Hence, by applying IIT, one can compute the slope and curvature of the loaded specimen along the length of any curved strip. It is quite easy for anyone to simulate the path of any random shaped grid pattern on the loaded images for different loading conditions by using the values of the slope obtained from ANSYS.
The advantages of IIT lie in its simplicity. It does not require too complex experimental setup and high speed, high resolution cameras as required in ESPI. Just two images before and after loading the reflecting specimen are sufficient to get the deformation field unlike a series of images captured in DIC. One can use other light sources like LED or white light, provided its luminance produces the reflected image. In the present study, the unidirectional IIT was successfully employed along the curved strips, but the partial slope was computed only along the length of the curved strips. The work is under progress to compute the deformation field for the entire domain using IIT without projecting any grid pattern, yet to be solved by iterative procedures.
Conflict of interestThe authors have no conflicts of interest to declare.
The authors are grateful to the referees for their many valuable suggestions to improve this work.
Peer Review under the responsibility of Universidad Nacional Autónoma de México.

